Sample code
all these examples use the demonstration API key, which is limited to 100 requests per day. If you want to use the API for a project, please contact us at developer help to get a production API key.
the demonstration uses the Enron email dataset, which is available at https://www.cs.cmu.edu/~enron/ which has been preprocessed and indexed by OmniIndex. The dataset is licensed under the Creative Commons Attribution-NonCommercial-ShareAlike 3.0 Unported License.
Set up the OmniIndex API client
before we dive into the code, firstly, set up your python virtual environment and install the omniindex package:
python3 -m venv venv
source venv/bin/activate
pip install --upgrade omniindex
to your environment variables, add the api_key you received from OmniIndex.
export OMNIINDEX_API_KEY=your_api_key
now you can start coding!
import omniindex as oi
import os
import json

api_key = os.environ['OMNIINDEX_API_KEY']
client = oi.OmniIndexClient(server="https://node1.omniindex.xyz/node",unit_name="enronemail",api_key=api_key, block_type="Owner", user="enronemail")
We can test this by fetching the block schema:
get_block_schematic
Now you can use the get_block_schematic method to fetch block schematics from the OmniIndex API:
block_schematic = client.get_block_schematic()
data = json.loads(block_schematic)
print(data)
You will now have a JSON output of the block schematic:
{'0': {'column_name': 'bodyowners', 'data_type': 'text'}, '1': {'column_name': 'bodysearchableowners', 'data_type': 'text'}, '2': {'column_name': 'contentsearchableowners', 'data_type': 'text'}, '3': {'column_name': 'context', 'data_type': 'text'}, '4': {'column_name': 'context2', 'data_type': 'text'}, '5': {'column_name': 'folder', 'data_type': 'text'}, '6': {'column_name': 'fromowners', 'data_type': 'text'}, '7': {'column_name': 'fromsearchableowners', 'data_type': 'text'}, '8': {'column_name': 'hash', 'data_type': 'character varying'}, '9': {'column_name': 'message_id', 'data_type': 'text'}, '10': {'column_name': 'oidxid', 'data_type': 'integer'}, '11': {'column_name': 'prevhash', 'data_type': 'character varying'}, '12': {'column_name': 'priorhash', 'data_type': 'text'}, '13': {'column_name': 'recieveddate', 'data_type': 'timestamp without time zone'}, '14': {'column_name': 'sentiment', 'data_type': 'text'}, '15': {'column_name': 'sentiment2', 'data_type': 'text'}, '16': {'column_name': 'subject', 'data_type': 'text'}, '17': {'column_name': 'toowners', 'data_type': 'text'}, '18': {'column_name': 'tosearchableowners', 'data_type': 'text'}}
get_folders
The get_folders method returns a list of folders in the dataset. You can use the showRedacted parameter to return the redacted data or the full data.
First, let’s get a list of folders with the data redacted: (The use case for this is check that folders are present in the dataset, without revealing the folder names)
folders = client.get_folders("false")
data = json.loads(folders)
print(data)
You will now have a JSON output of the folders:
{'results': [{'directory': 'Data has been redacted.'}, {'directory': 'Data has been redacted.'}, {'directory': 'Data has been redacted.'}, {'directory': 'Data has been redacted.'}, {'directory': 'Data has been redacted.'}]}
Now let’s get a list of folders with the full data:
folders = client.get_folders("true")
data = json.loads(folders)
print(data)
You will now have a JSON output of the folders:
{'results': [{'directory': '/data/user/0/com.example.dropblock/cache'}, {'directory': 'Dropblock/2023-03-07'}, {'directory': 'Dropblock/2023-03-02'}, {'directory': 'Dropblock/2023-03-01'}, {'directory': 'Dropblock'}]}Tests
get_searchchain
The get_searchchain method returns a JSON block for a search phrase within for a given block. You can use the showRedacted parameter to return the redacted data or the full data. There is one other parameter you can pass with this method, block_id, which is the block id you want to search within. If you don’t pass this parameter, the method will search within the latest block. which is fulltext or files - this means that if you only want to search the encrypted file content, you can do that with the files parameter.
Note
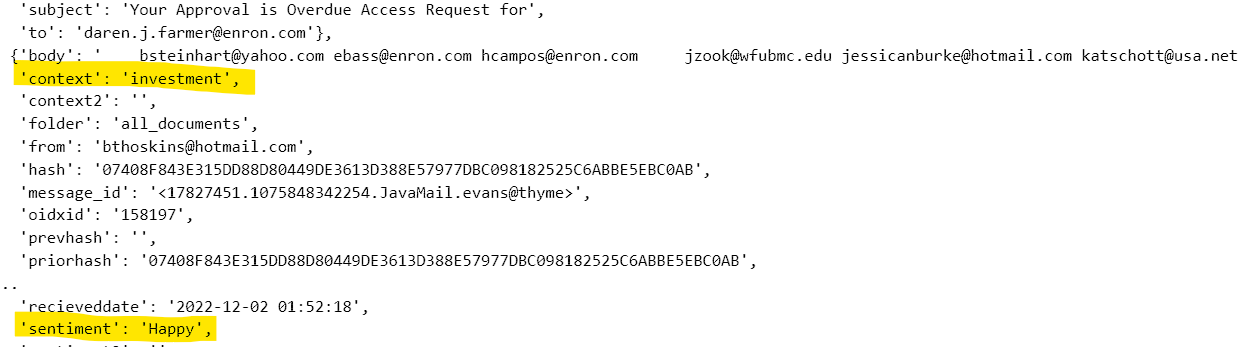
- The get_searchchain method is a perfect demonstration of how the OmniIndex Fully Homomorphic Encryption works. The data content is never decrpted, and the search is performed on the encrypted data. The search results are returned in encrypted form, and the data is never decrypted. Also note the two machine learning (Narrow AI) fields that are derived from the encrypted data:
sentiment
context
Let’s get stuck into a query on the blockchain:
searchresult = client.get_searchchain("true", "working with google workspace", "fulltext")
data = json.loads(searchresult)
print(data)
You will now have a JSON output of the search results, which in this case will be every document that has the search phrase ‘working with google workspace’ in the document content, or title, showing the context and sentiment of that document:
We could go on to pull a specific content block, or version of that content using the get_files method, and will explore that next.
{ "results" : [{"author" : "matthew@omniindex.io ,sibain@omniindex.io ,james@omniindex.io ","context" : "investment","datetime" : "2022-12-02 19:49:00","directory" : "/OmniIndex/demonstration","filecreateddate" : "2022-12-02 11:27:00","fileextension" : "application/vnd.google-apps.document","filemodifieddate" : "2022-12-02 19:49:00","filename" : "OmniIndex Distributed Data Platform with Google Workspace","file" : "JVBERi0xLjQKJdPr6eEKMSAwIG9iago8PC9UaXRsZSAoT21uaUluZGV4IERpc3RyaWJ1dGVkIERhdGEgUGxhdGZvcm0gd2l0aCBHb29nbGUgV29ya3NwYWNlKQovUHJvZHVjZXIgKFNraWEvUERGIG0xMTAgR29vZ2xlIERvY3MgUmVuZGVyZXIpPj4KZW5kb2JqCjMgMCBvYmoKPDwvY2EgMQovQk0gL05vcm1hbD4+CmVuZG9iago2IDAgb2JqCjw8L1R5cGUgL1hPYmplY3QKL1N1YnR5cGUgL0ltYWdlCi9XaWR0aCAyNTAwCi9IZWlnaHQgMTgwMwovQ29sb3JTcGFjZSAvRGV2aWNlUkdCCi9CaXRzUGVyQ29tcG9uZW50IDgKL0ZpbHRlciAvRmxhdGVEZWNvZGUKL0xlbmd0aCA0NDQ5MjY+PiBzdHJlYW0KeJzs3Xd8VHW+//H57d679+5dvevaQBGFLW5xXV0riHTQdfda1oKC0tKxixXFRk9mQu/SSZkSQugQWiDUhA5JICEJgZDe+2Tm8z2/OUHvXZIJTWBSXs/H+WMX4sznzJxzjOd9Pp+vpgEAAAAAAAAAAAAAAAAAAAAAAAAAAAAAAAAAAAAAAAAAAAAAAAAAAAAAAAAAAAAAAAAAAAAAAAAAAAAAAAAAAAAAAAAAAAAAAAAAAAAAAAAAAAAAAAAAAAAAAAAAAAAAAAAAAAAAAAAAAAAAAA4AwMDAwIG4gCjAwMDA4MTYxMzQgMDAwMDAgbiAKMDAwMDgxNjM4NiAwMDAwMCBuIAowMDAwODE2OTI5IDAwMDAwIG4gCnRyYWlsZXIKPDwvU2l6ZSAzNwovUm9vdCAyNCAwIFIKL0luZm8gMSAwIFI+PgpzdGFydHhyZWYKODE3NDQ3CiUlRU9G","filesize" : "749017","fullpath" : "/OmniIndex/demonstration/OmniIndex Distributed Data Platform with Google Workspace","hash" : "FB25A50F51EF1B009ED4D2BBB2466A4427A1C3A3F3F09358677BE797126D2CC3","oidxid" : "7","priorhash" : "AAEB383EC54C3AE02A982DEBC03934869BAC737863369BE836F4F7EAFE48D495","sentiment" : "Happy"}]}
(For convenience, we have excluded the majority of the Encryption hash)
get_files
In order to list files in a folder construct on the block chanin, we use the following (note that in this example we are using the pandas dataframe library)
fileresult = client.getfiles("true", "dropblock")
data = json.loads(fileresult)
data_df = pd.DataFrame(data['results'])
print(data_df)
This gives you a list of files in the folder, and the encrypted content of the file:
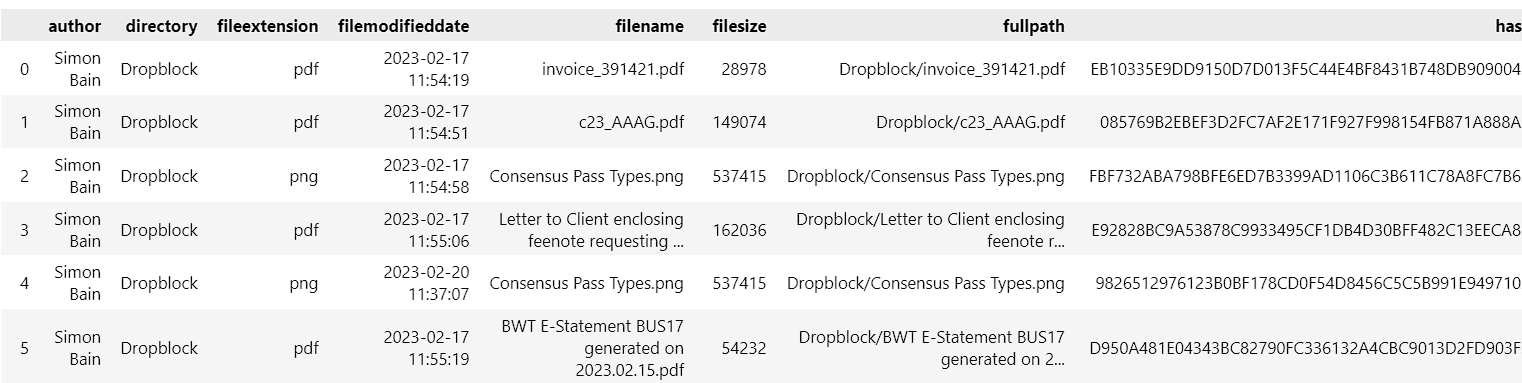
You can see from the structure of the returned dataset that there is a ‘context’ field included, which is automatically calculated by the OmniIndex engine against a narrow machine learning model or ontology. This is a great way to quickly identify the context of a document, and can be used to filter search results.
<class 'pandas.core.frame.DataFrame'>
RangeIndex: 20 entries, 0 to 19
Data columns (total 9 columns):
#   Column            Non-Null Count  Dtype
---  ------            --------------  -----
0   author            20 non-null     object
1   directory         20 non-null     object
2   fileextension     20 non-null     object
3   filemodifieddate  20 non-null     object
4   filename          20 non-null     object
5   filesize          20 non-null     object
6   fullpath          20 non-null     object
7   hash              20 non-null     object
8   context           2 non-null      object
dtypes: object(9)
run_analytic_query
This POST method will run a query on the Blockchain. To use it you are required to know the definition of the blocks that you are querying. If your where syntax includes data that has been encrypted for searching you need to use curly braces around your search string. EG:
SELECT X FROM Y where thissearchableowners LIKE '%{what am i searching for}%'.
The API will then convert this into a searchable ciphered stream. Running this query is akin to a SQL or OData query on any dataset, except this one is protected by OmniIndex’s patented FHE. The only thing to watch out for is that unlike standard SQL, there is no need to include the name of the datastore because that is defined by the unitName that we are working with. Similarly, there are no joins in ‘runanalyticquery’, but you can ‘SELECT’, ‘ORDER’, ‘LIMIT’ and set parameters including ‘LIKE’ to return the data that you want to query. Note that when returning ‘data objects’ as opposed to ‘file objects’, these will be base64 encoded and you will need to handle decoding in your own scripts. This is standard practice for all major data store providers. Notice that the select statement is ‘SELECT * FROM WHERE […]’
query = "SELECT * FROM WHERE contentsearchableowners LIKE '%{enron}%' LIMIT 10 "
queryresult = client.run_analytic_query("true", query)
data = json.loads(queryresult)
data_df = pd.DataFrame(data['results'])
print(data_df)
post_minedata
This POST method will add a new block on the Blockchain. To use it you are required to know the definition of the blocks that you are adding to. Blockchain by definition are immutable, so you cannot update a block, but you can add a new block with updated data. It is also necessary to pass the master encryption key when creating a new block as always, we would recommend that you never type this in your code, but use environment variables or a config file to store this information. Having followed these strict rules, you need only pass 2 parameters to the API which are the master encryption key and the data that you want to add to the blockchain. The data is passed as a JSON string, and the API will return only status code 200. It will do this even if you are unsuccesful in adding to the blockchain, we are very careful not to return any information that could be used to identify the data that is on your blockchain, even if the appaling event of your encryption key being known to a bad actor.
Note
1. Create a master encryption key. This is a key that only you will ever know and will be used to encrypt all data in the OmniIndex Blockchain. This key is the heart of the OmniIndex Blockchain and what makes us so unique. So long as this key is safe, your data can never be compromised. For this reason, you must keep this key safe and never share it with anyone. If you lose this key, you will lose all of your data. There are many enterprise grade encryption tools available to help you create and store your master key. 2. Set up your omniindex client with the unit_name of your choice (This should map to the business unit or use case for this blockchain. It is the name that will be used to identify your Blockchain. It is also the name that will be used to identify your Blockchain when you are querying it or running data analytics against it), user/password pairings. 3. Create a JSON object with the data you want to store in the OmniIndex Blockchain. This object must follow the rules outlined above.
Think hard about the data you want to store in the OmniIndex Blockchain. You can store anything you want, unstructured blobs of ‘stuff’ or structured filesystems. The choice is yours. The only thing you need to remember is that there is no going back. The schema of the blockchain is set at the time of creation and cannot be changed. (If it could, it would not be the immutable ledger or system of record that is a key feature of OmniIndex).
Warning
If you are using the OmniIndex API to add data to the blockchain, you are responsible for ensuring that the data you are adding is compliant with the GDPR and other data protection laws. You are also responsible for ensuring that you have the right to add the data to the blockchain.
Note
as of version 0.1.11, the JSON parser will only accept strings, so you will need to convert any numbers to strings before adding to the blockchain.
import os
NODE = os.environ.get('OMNIINDEX_NODE')
USER_KEY = os.environ.get('OMNIINDEX_USER_KEY')
UNIT_NAME = os.environ.get('OMNIINDEX_UNIT_NAME')
USER = os.environ.get('OMNIINDEX_USER')

client = OmniIndexClient(NODE, USER_KEY, UNIT_NAME, 'Owner', USER)
# even though the data is JSON, it needs to be passed as a string, see the unix timestamp and filesize examples below
data = '{"blahEncrypt": "blah1", "contentsearchable": "Some fabulous content", "dateAdded": "2021-01-01", "dateModified": "190266420000", "fileExtension": "txt", "fileSize": "100", "filename": "test.txt"}'
result = client.post_minedata(MASTER_KEY, data)
print(result)
Datasets, dataframes and pandas
If you want to use the popular Pandas dataframe library, the OmniIndex API returns JSON string, which needs to be loaded as JSON using the JSON library.
import pandas as pd
import json

searchresult = client.get_searchchain("true", "working with google workspace", "fulltext")
data = json.loads(searchresult)
df = pd.DataFrame(data['results'])
print(df)
Tests
There is a set of tests that can be run against the API endpoints. These are not exhaustive, but they do cover the main functionality of the API and are included in the file tools/omni_api_test.py and utilise the pytest package which should be installed in your virtual environment.
API endpoint tests
to run the tests, first install the pytest package:
pip install pytest
Note
- you will need to have set the following environment variables:
‘OI_API_TEST_NODE’ the node you want to test
‘OI_API_TEST_USER_KEY’ the user key you want to test
‘OI_API_TEST_DEMO_KEY’ another user key you want to test
‘OI_API_TEST_USER_DEMO’ the user name of the user key you want to test
‘OI_API_TEST_UNIT_DEMO’ the unit name of the user key you want to test
then run the tests:
def test_ssl_api_endpoint():
 # import the requests library
 import requests

 endpoint = "https://api.omniindex.xyz/api_v1" # set the api endpoint
 response = requests.get(endpoint, verify=True) # make a request to the endpoint

 assert response.status_code == 200 # assert that the response is successful
Redaction test
When you run a call with showRedacted=True, the API will return the redacted data. To make sure that the redaction is working correctly, we have a test that checks the redaction has happened when set to ‘false’
USER_DEMO_KEY = os.getenv('OI_API_TEST_DEMO_KEY')
UNIT_DEMO = os.getenv('OI_API_TEST_UNIT_DEMO')
USER_DEMO = os.getenv('OI_API_TEST_USER_DEMO')

def test_get_folders_false_returns_json_string():
 """Test that the get_block_schematic() method returns a valid JSON string when showProtected is set to false"""
 client = OmniIndexClient(NODE, USER_DEMO_KEY, UNIT_DEMO, 'Owner', USER_DEMO)    # user your own api key etc here
 json_string = client.get_folders("false")
 assert type(json_string) == str
 assert json.loads(json_string) is not None
 assert json.loads(json_string) != {}
 json_data = json.loads(json_string)
 assert "Data has been redacted" in json.dumps(json_data) # check that the data has been redacted
Count of chains in the blockchain test
This test is super useful to check how many chains there are in the blockchain, most often used when you want to know the number of chains with a particular data set within (although this test just returns the total, you can create your own SQL command for more complex queries)
def test_get_blockchain_count():
 """Test that the get_blockchain_count() method returns a valid JSON string"""
 client = OmniIndexClient(NODE, USER_DEMO_KEY, UNIT_DEMO, 'Owner', USER_DEMO)    # user your own api key etc here
queryresult = client.run_analytic_query("false", "SELECT COUNT (*) FROM ")
data = json.loads(queryresult)
assert data['results'][0]['count'] >= 1